CAUTION: Since all
filter papers in the same container may not be free of contaminants, or
may not have the same level of contaminants, the result of laboratory
tests of wall wash samples could be adversely affected by the filter
papers.
-
Sufficient wash liquid
(usually reagent-grade Methanol).
CAUTION: Any liquid used for
wall washing must first be determined to be safe for use in a confined
space.
-
Clean wiping rags,
Note: Clean plastic gloves,
forceps, or tweezers should be used to handle filter papers.
GENERAL PROCEDURES
Prior to tank entry, wall wash
personnel shall be equipped with safety equipment (such as gloves,
masks, and respiratory protection equipment) whenever the liquid used
for wall washing may adversely affect the gas-free condition of the
tank interior.
Use the following chart to
determine the minimum number of areas to be selected for wall washing
in any tank.
Table Wall Washing Tanks
|
Tank Capacity |
Minimum
No. Areas to Wash |
|
<500 M3 (3000 bbl) |
5 |
|
500-1000 M3 (3000--6300 bbl) |
7 |
|
> 1000 M3 (>6300 bbl) |
9 |
The following procedures are
recommended for all tank wall washing operations:
-
Do not perform wall washes on
wet tanks. Request vessel personnel to dry the tanks.
-
Each washed area should be
about 3 ft. (1m) wide and 6 ft. (2m) high from the bottom of each tank.
Higher areas that can be safely accessed may also be washed.
-
Discoloured patches, tank
coating breaks, or exposed sections, and all
other non-typical areas on the tank walls of tanks and tank floors must
be noted on the report and tested as follows:
1. In any tank where the
non-typical area is less than about 20% of the total surface area of
the tank, include the wall washings with those from the rest of that
tank.
2. When the non-typical area
exceeds 20% of the tank surface area, keep wall washings from these
areas in a separate bottle and perform separate analysis.
It may be noted that if you
are in doubt about the size of non-typical areas, keep wall washings
separate and report the approximate size of the tank and of the
non-typical areas represented by the sample.
-
Tank bottoms (floors) often do
not require wash testing. However, if wash testing is
required, use the Blotter Method.
-
The laboratory must be
informed in advance if analysis is required on wall wash samples. The
laboratory is responsible to communicate test results promptly to
inspection personnel.
FUNNEL
WALL WASH PROCEDURE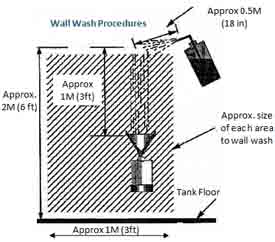
-
Put on plastic gloves prior to
starting the test.
-
Rinse wash bottle, funnel, and
sample bottle with a small amount of washing liquid.
-
Place the spout of the funnel
into the sample bottle and hold the flat side of the funnel firmly
against the surface to be tested.
CAUTION: To avoid
possible contamination of samples with suspended matter, care must be
taken not to scrape zinc tank coatings with the edge of the funnel.
-
Using the wash bottle, spray a
steady stream of the washing liquid on the surface of the tank wall,
about 3 ft. (1m) above the funnel, with the wash bottle held about 18
in. (0.5m) away from the wall. Allow the wash liquid to run
down the wall into the funnel and into the sample bottle.
-
Continue spraying until about
50 ml of wash liquid has been used.
-
Repeat steps c through e until
a sufficient quantity of wall washing liquid has been received into the
sample bottle for the entire tank. Samples must also be taken
from horizontal pipelines, large baffles, dividers and superstructures.
-
Rinse the inside of the bottle
cap with a small amount of wash liquid and place securely onto the
bottle.
-
Prepare a blank sample (an
unused portion of the wash liquid before it was used for wall washing).
-
Tag each wall wash sample and
the blank sample immediately to avoid losing the identity of the
samples.
-
Submit to the laboratory for
required analysis
-
Wall wash reports should
specify where each wash sample was taken in the tank.
BLOTTER
WALL WASH PROCEDURE
It may be noted that since
filter papers are not consistent in chemical composition, the blotter
wall wash procedure should be used only when it is not practical to use
the funnel wall wash procedure.
-
Put on plastic gloves prior to
starting the testing.
-
Rinse wide-mouth sample bottle
with a small amount of wash liquid.
-
Hold a piece of laboratory
filter paper against the surface of the wall a few inches above the
floor. Use the laboratory wash bottle to spray about 50 ml of
wash liquid onto the test section, about 3 ft. (1 m) above the floor,
in a stream about 4 in. (0.1 m) wide. Allow the wash liquid
to run down the wall and be absorbed by the filter paper being held
near the floor. Do not rub or wipe the filter paper on the
tank wall.
It may be noted that clean
plastic gloves, forceps, or tweezers should be used to handle filter
papers.
-
As the test papers are
saturated, carefully fold and place them in the wide-mouth bottle.
CAUTION: Perspiration will
contaminate the samples. Do not permit perspiration to drop
into the sample bottle or onto the filter papers.
-
If required, wash the tank
bottom by placing a filter paper on a spot wetted with the wash
liquid. Then lift the filter paper carefully, fold it, and
place into the wide-mouth bottle. Do not take tank bottom
samples where there has been foot traffic.
-
Rinse the inside of the
plastic cap with a small amount of wash liquid and cap the bottle
containing the wall wash filter papers.
It may be noted that the
following steps may be performed after leaving the tank.
-
Prepare a blank sample as
follows:
-
Rinse
a wide-mouth bottle with a small amount of the wash liquid.
-
Take
an unused filter paper from the box and place it into the rinsed wide-
mouth bottle.
-
Add
wash liquid from the wash liquid spray bottle.
-
Rinse
the plastic cap with wash liquid and securely cap the bottle containing
the blank sample and filter paper.
-
Immediately identify both
samples with appropriate sample tags and deliver promptly to the
laboratory.
Sections of text taken from API - MPMS Chapter 17 Marine Measurement
|