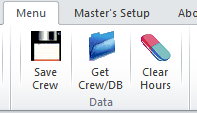
Once data has been entered for a crew member, the user clicks on the Menu Dialog box ‘Save Data’ button (Ribbon in Office 2007) to save data for that crew into the database. If a Save Data routine is executed after 35 days from start of computing period, the date and time of saving is shown in red font instead of the normal black font. See the image below.
The short-Cut for saving is 'CTRL-S (Hold the CTRL key and press S).
If the master has marked a crew as signed off (inactive), the inactive crew's row is shown in brown font colour (Master user) and in red font (other Fleet users). The master may get the records of inactive crew into the Hours page but will not be able to save any changes. Other Fleet users will not be able to get records of inactive crew into the Hours page.
For Fleet users, the font colour is changed to black for those crew who have not entered any data for the last 3 calendar days. The heads of department and the master can, by observing the black font colour, quicky determine which crew need to complete their data entry.
At the end of the reporting period, the master can export data for selected crew to a small text file than can be e-mailed to the office and imported into the project there. Thus saving paper and time and allowing the office staff to see the computed results readily.
Data for any crew member is imported into the project by clicking on the Menu Dialog box (Ribbon in Office 2007) ‘Get Data’ button and selecting the crew from the list displayed as in the image below. The user can filter from - Vessel / Rank / Department / Computing Period Start Date / Vessel Type / Vessel Nationality / User.
The short-Cut for this dialog box is 'CTRL-G' (Hold the CTRL key and press G).
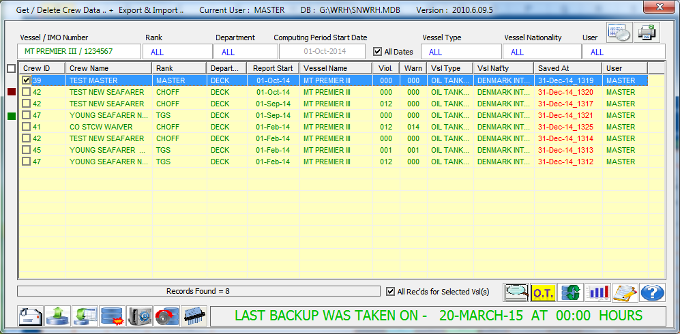

The user may click on the square buttons to the left of the list to filter only Inactive or only Active records. If a filter is executed, the square will change to a grey colour and if clicked, will reset the filter to fetch Inactive + Active records.
EXPORT+EMAIL or EXPORT, IMPORT, DELETE OLD, BACKUP, RESTORE, ADD TO CHART, BULK DATA (SUB-TOTALS), EXPORT O.T. INSPECTION RECORD
Database Utilities is available to the Master and Office users only.
These icons in the Get Crew / DB & Utilities dialog box are displayed only for user in the office and for the Master.

 The master and office users may permanently delete selected records by clicking on the 'Delete' icon and confirming from the next dialog box. Multiple records can be selected at the same time for deletion. (Hold the CTRL key and select non-contiguous records. Hold the SHIFT key and select contiguous records).
 The master uses this dialog box to Export data to small text files. Only the Master can Export data. The Master and Office users can import data from the text file into the database. Multiple files can be selected at the same time for appending to the database. A record of import operations is saved to simple text files in WRH\Import Record and this is for the benefit of the office user to keep track of incoming files for import into the office database. The text file contains the names of the ships in the batch import and the date and time of import. A copy of the imported files are saved in WRH\Archive\Imported Files. The exported files can be found in WRH\Archive\Exported Files.
 Only the Master or CEO user can Delete old records (older than 3 years) and make a complete back up of the database with the current date and time appended to the file name. If for any reason the database has been corrupted, the Master or CEO user can restore the database from a previously saved one.
![]()
In order to allow for a closed loop for inpection by authorised persons such as the heads of department on the ships or the Fleet / QA superintendents, the user may click on this icon to open a separate dialog box as follows -
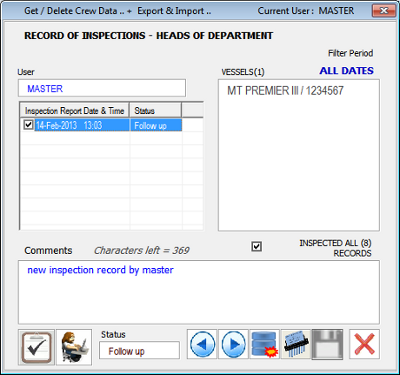
To create a new inspection record, click on the icon at the bottom left with the 'checkmark' image. The list of ships in GET CREW/DB dialog box will be shown in the Vessels box and the number of records in the current filter will also be displayed below this box.
The user may enter any comments in the Comments text box (max. 400 characters) and after checkmarking that all records have been inspected, saves the record. The list box will be appended with the date and time of saving and shows the status as set by the user.
Records older than one year may be deleted at one go from the appropriate icon in the bottom bar. Individual records can be delted from the 'shredder' icon.
This tools is of more use in the ship owner's office than on the ships and assists the users and the head to keep a track of inspections of the records. The list may be presented to auditors to exhibit the degree of involvement by the concerned authorities on the ships and in the office.
The records for inspection for each user are saved to separate encrypted text files in the WRH\InspRecords folder.
 The Master and Office users may click on this button to extract the list of crew in the current filter to a separate Excel workbook with columns showing the overtime hours, worked hours, rested hours and crew's heads of department name and rank.

The users may print reports for more than one crew at one go by clicking on this icon
For the sake of companies with many ships, the monitoring at the office can become tedious. This necessitates the export of data as filtered to a separate Excel page from which the user can create sub-totals, charts and create a narrative in a MS Word document. These features are incorporated in the Office BulkData Menu tab. This icon & associated features are available only in the 2007 or later version. See image below.

When the user filters by Vessel /IMO Number (this would be relevant to the office users), a list of vessels is shown. The user (fleet superintendents) may select up to 12 ships to save in his/her user profile. (Hold the CTRL key and select non-contiguous records. Hold the SHIFT key and select contiguous records). The office users may also select all the vessels or none of the vessels by clicking on the appropriate icons.
 Only the CEO user sees the 'DELETE VESSEL' icon. The CEO as user can select one or more vessels and permanently delete all records in all the database tables. This process cannot be reversed except from a backup database.
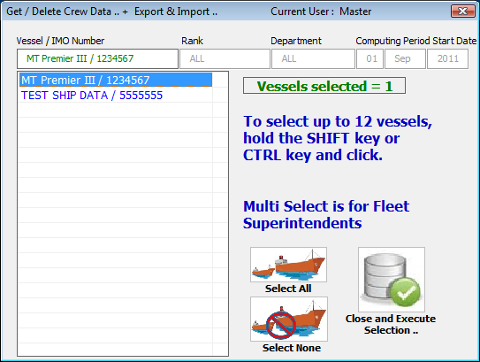
To Export data, the user should first filter the records that are to be exported. Then, when the 'Export' button/icon is clicked, a small text file is generated in the same folder as the database folder.
Only the records seen in the list box will be exported. So the user should filter the desired records before exporting. The user is allowed to change the file name before it is saved, so he/she can save any number of data text files - for back up or for e-mailing to the office / ship.
 The Master can Export and attach the created file in one step by clicking on the Email Icon.
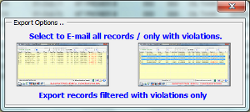
There is a sub-filter facility which allows the Master to export all the records in the current filter or only those with violations. If the shipowner requires the Master to export data everyday, the 'Export Violations Only' choice is very good to save on INMARSAT time. However, the exported records will not contain the Head of Dept's signature if the HOD does not have any violations during the same period.
The 'Export All' choice can be used at the end of each month, in which case, the office will have a record of all the crew. In this case the exported records will have the crew member and HOD signatures as the HOD records will be present for same period.
The path for the database file is shown in cell 'K10' in the 'Hours' page. However, the user is advised not to change anything in the database directly but to always use the main project for all the necessary functions.
The user may store this Export text file in lieu of a back up or may e-mail it to other users. (E-mail to the office at the end of the month).

The master can set up a schedule for exporting crew records. When this icon is clicked, the GET CREW/DB dialog box shows a weekday selector and a text box for entering the time of export as follows -
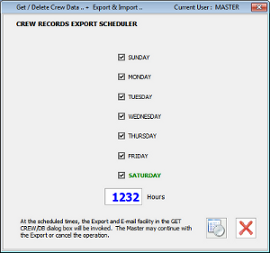
A text file is saved with the schedule and the dialog box shows the next scheduled export date in green font.
The software has to be running for the scheduler to be invoked at the prescribed times. (The export is not done in the background).
At the schedule, the GET CREW/DB dialog box is shown and the master may continue with the export process or cancel it.
If the Master/Office Superintendent is installing an upgrade project (new version), he/she should first select all vessels, all departments, all vessel types, all vessel nationalities, all users and all dates and Export the data to a text file and name it accordingly. A full backup of the database should also be taken.
Close the software and rename the existing .exe files.
The upgrading process does not affect the custom database file.
After replacing the parent project with the new version, the Master/Office Superintendent can (if necessary only), Import the data back into the database by clicking on the Import button and selecting the appropriate file or Restore the entire database from the backup. However, this should not be needed as upgrading does not affect the custom database.
Test the new product - if all is OK, you can delete the old renamed .exe files.
Another method, would be to simply zip the entire WRH folder and save the zip file in a separate location. After upgrading, if all is found OK, the zipped file may be deleted.
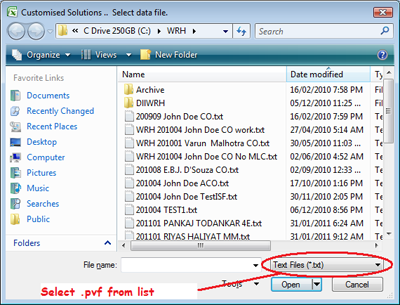
To Import data, the user selects the appropriate file from the browser.
Records in the text file are appended to the database if the records do not exist and are overwritten if found (already existing). After importing, the list box is refreshed.
If the default file type is not .PVF, select 'WRHExport, *.pvf' file type from your browser drop-down list. - See below -
This button is also used to import language packs into the database. If the customer has purchased a language pack (or packs), the vendor will e-mail small encrypted text files. The Master saves the file(s) in the same directory as the main project and clicks on the Import icon to append the database with the new language packs.
In order to keep the database size as small as possible and in keeping with quality standards, the Master/CEO may permanently delete records that are older than three years. This is done by clicking on the 'Delete Old' icon and confirming the order from the next dialog box. After deleting, the list box is refreshed. Records thus deleted cannot be recovered except if the user had saved the data to a text file by using the Export facility.
The Master or CEO may save a full back up of the database by clicking on the 'Backup DB' icon (5th icon in the image below) and then on the 'Only Make A backup'. The backup file will have the current date and time 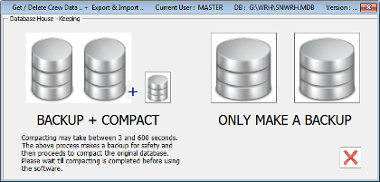 appended to the file name. In case the main database file gets corrupted, the user may delete it and rename the backup as 'SN????WRH.mdb" where ???? are the special characters for the purchaser. Alternatively use the Restore DB facility.
The Master and Office users see a message bar with the date and time of the last full back up. Recent backups are shown in green font. If a moderate time has elapsed since the last backup the font is changed to orange colour and finally to red if too much time has elapsed since the last backup. See images below -


If the back file is missing, the message bar displays an appropriate message prompting the user to take a fresh backup.
Sometimes, the MS Access database can increase in size, a phenomena that is called 'Database Bloat'. To reduce this 'bloat', Microsoft has provided a 'Compact and Repair' function which the Master or CEO user may invoke by clicing on the 'Backup + Compact' icon. A full backup is taken automatically before the compacting process is started. In case of a compacting failure, the user may restore the database from the backup.
At the office, only the CEO user may Compact or take a full backup of the database.
Note: When compacting or taking a backup, the Master or CEO should ensure that the software is not being used by anyone else on the LAN for the period of the compact or backup operation.
When the Restore DB icon is clicked, the Windows browser opens to the folder where the back ups are stored.
Select the file required and confirm by typing the PIN in the pop up box.
As in the image above, if MS Access files are not shown, click on the file type drop down arrow to select MS Access file types.
The old database will be saved with the current date in its name and the back up will be used to copy itself to the file 'SN????WRH.mdb" where ???? are the special characters for the purchaser.
Note: When Restoring, the Master or CEO should ensure that the software is not being used by anyone else on the LAN for the period of the Restore operation.
When the Add to Chart icon is clicked, the selected records (a maximum of 16) are extracted and sent to the Chart Table in one stroke. All previous data in the Chart Table is erased. The Master user will see full NC summary report for the selected crew.