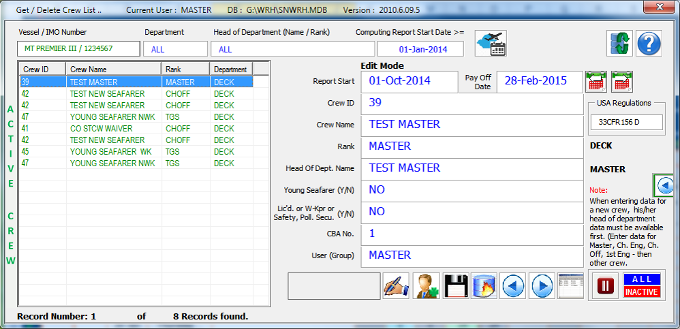
The Get Crew / DB dialog box is populated with records for crew members that have been first created by the Master user via the Crew List icon in the Menu dialog box (Ribbon in Office 2007).


This dialog box has two types of displays -
1. a list view of all the crew entered and in the database over the previous year as follows -

2. a screen showing one crew at a time with a shortened version of the list as follows -

The Master has to enter his/her data first and save by clicking on the floppy disk icon.
Then, the Master has to enter the data for the heads of departments (Chief Engineer, Chief Officer, 1st Engineer, Etc.)
Licensed or W-Keeper has to include those with designated duties towards Safety, Security, Pollution or on Rostered Shifts.
The Master can select the USA Regulations clauses individually for each crew. If the company has not opted to have us block the choice, the crew will be able to select a different clause at any time. This is necessary where the ships will be sailing in and out of the USA waters. The company may choose to have us block all the choices where their vessels do not come under the USA administration at all in which case, 'N/A' will be shown as default.
CBAs - Use 1, 3, 5 or 7 for Officers and 2, 4, 6 or 8 for Ratings. (Up to 4 diferrent CBAs for Officers and 4 for Ratings can be assigned by the Master in the List of Holidays page)
Then the Master may enter the data for the rest of the crew in any order.
When a crew member joins the vessel the Master has to create the new crew's record before the records can be seen in the Get Crew / DB dialog box.
The Master can select a signature image file for each crew. The signatures will not be printed when the software is used on the ship. When the Master exports data files, the signatures are included with the monthly data. If the Office user prints a file, the signatures are printed as well. To reduce the file size, the Master should ensure that the images are in black and white. Only JPEG images are acceptable by this software.
If your office does not require to receive the signatures as above, please do not attach any signature images from this dialog box as image files increase the size of the database. Also, it increases the size of the file which the Master may send to the office each month by INMARSAT.
On the ships, if the reports are not printed on paper but saved to .PDF files, it is necessary to save the scanned signatures of the heads of department only. In this way, when the .PDF is e-mailed to the individual crew (in lieu of a paper print), it will bear the scanned signature of the concerned head of department.
A signature image previously assigned can be deleted by right-clicking on the image.
Setting up of 'Normal' working hours.
The master may prepare a set of templates representing the 'normal' working hours of the crew by clicking on the icon on the far right, (with the blue arrow) in the above image. This will show the Template Control screen.


The first icon with the green clock is used to clear the A.M. / P.M. bar. The master may then click and drag the hours to set up a new pattern of working and resting hours. When the A.M./P.M. bar is used directly, a message prompt is shown if the hours selected will result in a non-conformity for the given parameters (MLC/STCW, USA clause, watch-keeper or non watch-keeper, etc.). This can be confirmed by the master by clicking on the second icon ('Test Validity' icon), when the 'Hours' page will be populated with the selected hours thus showing the calculated results in detail. The master saves the template by clicking on the 'Floppy disk' icon and giving the new template a 'friendly' name for easy identification (Example 'Dayworker').
The master assigns the 'normal' working hours for each crew by selecting the working hours from the 'Existing Templates' drop-down and clicking on the 'Select Templete' icon at the right hand side of the drop down box, or by using the A.M./P.M. bar directly. The working hours are saved for the selected crew when the 'Floppy Disk' icon at the bottom is clicked.
When 'normal' hours are assigned for any crew by the master, the 'Hours' page for that crew will be auto-populated with these hours for all future dates until the crew has been made 'inactive' (signed off) by the master.
 If made available in the license file, the icon with the blue mouse image may be used for setting up working hours in fractions of less than 30 minutes.
Example 08-12 13-15 19.8-24
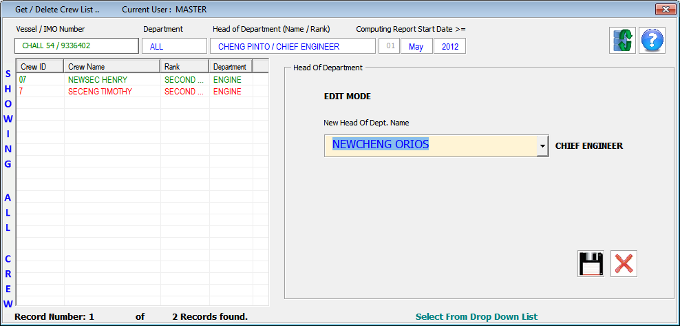
If the new crew is also a head of department, the Master has to amend the data for all the crew under the supervision of this new head of department. The Master can  use the Head of Department (Name / Rank) filter for this purpose to extract only the records with the name of the previous head of department and then replace the previous name with the newly joined head of deptartment from the sub-box after clicking on the Change HOD icon. When the Save icon is clicked, the HOD name and rank is changed for all the 'Active' crew in the list box to the left. If necessary, adjust the Computing Report Start Date >= filter to get only the required records in the list box.

In the above example, the HOD 'CHENG PINTO' for crew 'NEWSEC HENRY' will be changed to 'NEWCHENG ORIOS'. This will be done for all 'Active' crew in the left hand side list box (in Green Font Colour). Crew who are Inactive (in Red Font) will be bypassed.
Setting the Pay Off date / Sign Off (Make Inactive) A Crew.

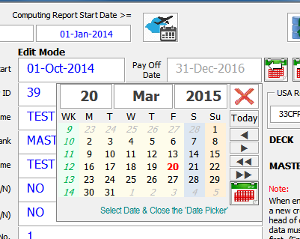
The pay off date is set to the 1st of December of the next year by default. The master has to change this date to the actual date by selecting the actual date using the calendar control. Clicking inside the 'Pay Off Date' field will show a calendar control.
The master may select the current date by clicking on the 'Today' button.
Double-clicking on a date or the icon at the bottom right of the calendar control sends the selected date to the relevant field.
Data is actually stored in the database only when the Save icon with the Floppy Disk image is clicked.

The Master may make any crew inactive (upon signing off the vessel) by clicking on the 'Sign Off This Crew' icon. When this is done, the crew's record is made inactive to all all logged in users except for the Master and Office users. Before making a crew inactive, the master should ask the respective HOD if the crew member's report has been completed and printed. A crew can be made Inactive only if the Pay Off date is not more than one day later than the current date. If the pay off date is later than one day from the current date, the software will open the 'Set / Change Pay Off Date' box (see image above), from where the master can change the date from the drop-down selection or selecting the current date by clicking on the icon with the baggage trolley.

To make an inactive crew active again, the master can click on the 'Sign On This Crew' icon. The Pay Off date will be set to the last date of the next year by default.

From the crewlist dialog box, the Master can filter the list to show 'All' or 'Active' or 'Inactive' crew. This is done by clicking on the buttons as in the image to the left. The Master also change the filter by double-clicking or right-clicking the 'SHOWING ALL CREW' bar seen in the image above.

The master may filter the records by 'Pay Off Month'. Clicking on this icon the first time, will filter the crew who have been set to sign off during the current month. Thereafter, left-clicking will filter the previous month and right-clicking will filter the records for the next month.